

Views: 0 Author: Site Editor Publish Time: 2026-08-20 Origin: Site


Installing pocket doors saves valuable floor space, but the structural margin for error is incredibly thin. Builders and homeowners love them because they slide cleanly out of sight. However, a traditional swing door allows for simple hinge adjustments if things go wrong. Pocket doors offer no such luxury. If you make an error in your rough opening or specify the wrong components, fixing it usually requires tearing out finished drywall.
A successful installation relies heavily on three perfectly aligned variables. You must match precise door slab dimensions, accurate framing calculations, and weight-rated hardware. Failing to align these elements will eventually lead to rubbing, scraping, or a door derailed inside the wall. We know these outcomes frustrate clients and destroy project timelines.
This guide breaks down everything you need to know about sizing and framing. We will explore standard slab dimensions, exact rough opening math, and realistic framing considerations. You will learn how to select the right track and roller systems. By following these guidelines, you can ensure a flawless installation and avoid costly drywall demolition down the road.
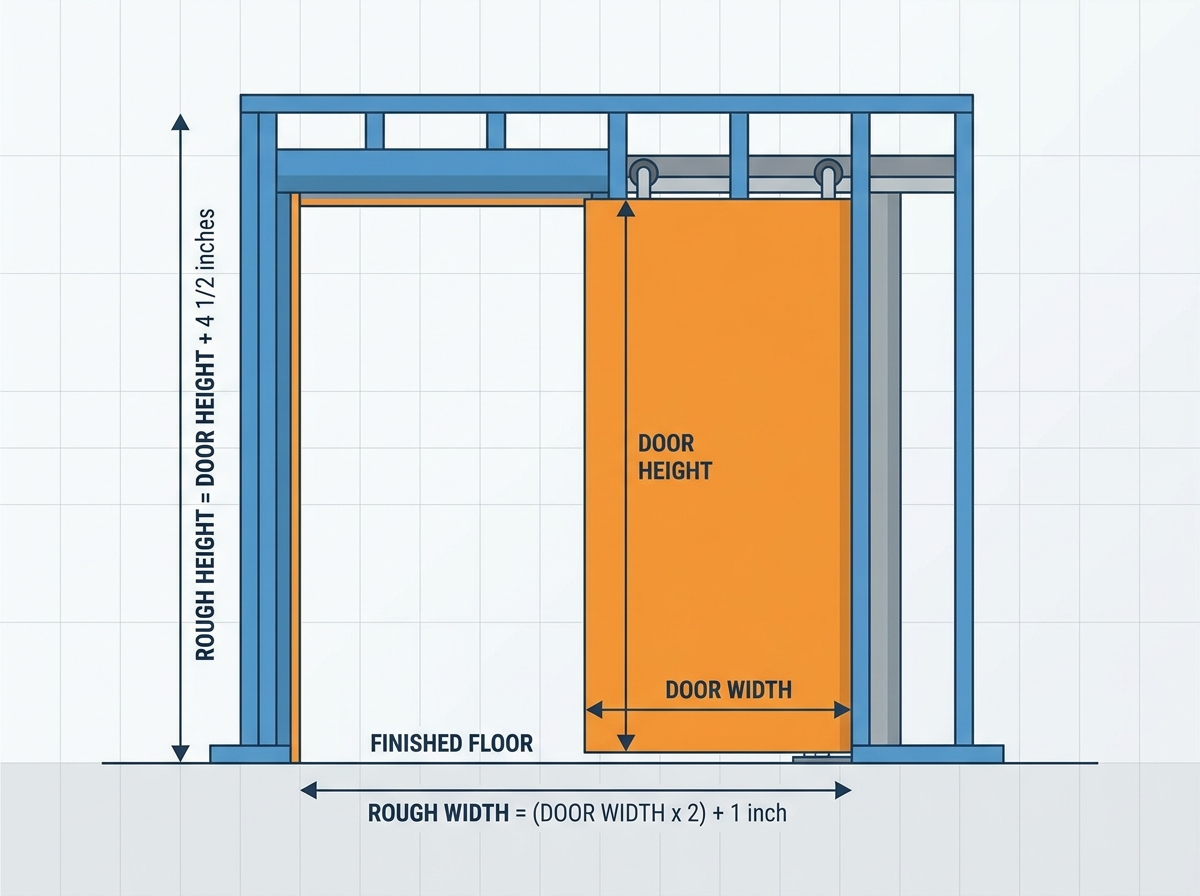
Rough Opening Formula: The industry standard rough opening for a pocket door is typically exactly twice the door width plus 1 inch, and the door height plus 4 ½ inches (though specific hardware kits dictate final framing).
Hardware Alignment: Standard pocket door hardware supports 1-3/8” thick doors up to 150 lbs, but solid-core or oversized doors require heavy-duty track and ball-bearing roller upgrades.
Wall Thickness: Standard 2x4 framing works for most residential doors, but 2x6 framing is strongly recommended for heavy doors, commercial use, or walls requiring electrical/plumbing bypasses.
Framing Realities: Wood studs warp; utilizing steel-wrapped studs or engineered lumber for the split-jamb pocket prevents the wall from bowing and scraping the door over time.
Selecting the right door slab is your first major decision. You must understand standard dimensions before you can calculate your framing requirements. Most residential projects use standard sizes to keep costs manageable. Custom doors offer design flexibility but introduce complex hardware requirements.
Standard residential widths typically range from 24 inches to 36 inches. Manufacturers usually offer these in two-inch increments. For example, a 28-inch or 30-inch slab is very common for bathroom entries. Standard heights sit at either 80 inches (commonly called 6'8") or 84 inches (7'0"). When evaluating thickness, the industry relies on two primary measurements.
1-3/8 inches: The standard thickness for most interior hollow-core or standard solid-core residential doors.
1-3/4 inches: Typically used for exterior grade doors, solid hardwood slabs, or specialized architectural designs.
Door Type | Common Widths | Standard Heights | Typical Thickness |
|---|---|---|---|
Standard Interior | 24", 28", 30", 32", 36" | 80", 84" | 1-3/8" |
Oversized / Commercial | 36", 42", 48" | 84", 96" | 1-3/4" |
Custom Architectural | Varies | Up to 120" | 1-3/4" or 2"+ |
Door material dictates the overall weight. Hollow-core MDF doors are exceptionally light. They usually weigh between 30 and 50 pounds. This low weight makes them easy to slide and gentle on standard tracks. Conversely, solid wood or solid-core doors easily weigh over 100 pounds. Slabs featuring large glass inserts often push past 150 pounds.
Weight serves as your primary filter for component selection. You cannot guess this number. Always check the manufacturer specification sheet for the exact slab weight. If you underestimate the weight, the rollers will prematurely wear out. The door will drag, and the track may bend under the prolonged stress.
A major risk involves using standard component kits for doors exceeding 1-3/8 inches in thickness. Standard split-jamb frames have very tight clearance tolerances. If you force a 1-3/4 inch door into a standard pocket, the door will rub against the framing. As humidity changes throughout the year, the wood expands. This expansion turns a minor rubbing issue into a completely stuck door. Always verify clearance tolerances before purchasing materials.
Accurate framing dictates the success of your installation. Your framing must be perfectly plumb, level, and square. If the framing is slightly out of square, the door will not sit flush against the closing jamb. We always recommend double-checking measurements before cutting any lumber.
Contractors rely on standard mathematical formulas to determine framing dimensions. These baseline measurements give you enough room to install the split studs, track, and mounting brackets.
Calculate Rough Width: Multiply the door width by two, then add one inch. For example, if you have a 36-inch door slab, multiply it by two to get 72 inches. Add one inch. Your required rough width is 73 inches.
Calculate Rough Height: Take your door height and add 4 ½ inches from the finished floor level. For an 80-inch door, your rough height must be 84 ½ inches.
The header height requires special attention. Unlike a swing door, the header must span the entire rough opening. It does not just cover the doorway entrance. The continuous track mounts directly into this header. It must support the entire weight of the door as it travels into the wall cavity. Use strong engineered lumber to prevent the header from sagging over time.
Next, carefully evaluate your finished floor assumptions. Rough height calculations must account for the final flooring material. Are you installing thick hardwood over an existing subfloor? Are you adding mortar and tile? These materials add significant height. If you frame the rough height from the bare subfloor without adding the flooring thickness, your door will drag. Correcting bottom clearance issues later is notoriously difficult.
We must emphasize a crucial point regarding these calculations. These formulas act as excellent general guidelines. However, you should always defer to the specific specification sheet provided by the hardware manufacturer. Different brands engineer their mounting brackets differently. Some tracks sit higher into the header space. Always check the manual before framing.
Once your framing plan is set, you transition into component selection. Choosing the right pocket door hardware separates a flawless installation from a maintenance nightmare. Do not cut corners here. Cheap components inevitably fail, forcing you to destroy the wall to replace them.
The market categorizes these kits based on weight capacity and material durability.
Standard-Duty Kits: These kits typically handle capacities between 100 and 150 pounds. They usually feature nylon tri-rollers and standard aluminum tracks. These systems work perfectly for standard 1-3/8 inch hollow core doors. They offer quiet operation for lightweight residential applications.
Heavy-Duty and Commercial Grade: These kits support 200 to 400 pounds or more. They utilize extruded aluminum box tracks instead of simple folded metal. The rollers feature precision ball bearings inside 3-wheel or 4-wheel carriages. You absolutely need these heavy-duty upgrades for solid wood slabs, glass inserts, or oversized dimensions.
You should prioritize jump-proof tracks. Jump-proof designs enclose the roller carriage inside an extruded box. This prevents the door from bouncing and derailing off the track. A derailed door inside a wall cavity represents a catastrophic failure. You cannot easily reach inside the pocket to lift a heavy door back onto the rails.
Soft-close and soft-open mechanisms offer excellent protective benefits. When people slide doors forcefully, they slam against the jamb. This slamming damages the door edge. More importantly, it sends shockwaves through the internal framing. Over time, these impacts cause stress fractures in the drywall. Soft-close dampeners catch the door and glide it silently to a stop, protecting the entire wall assembly.
Hardware Grade | Weight Capacity | Track Material | Roller Type | Best Use Case |
|---|---|---|---|---|
Standard-Duty | Up to 150 lbs | Standard Aluminum | Nylon Tri-roller | Hollow core, light MDF |
Heavy-Duty | 200 - 300 lbs | Extruded Aluminum Box | Ball-bearing 3-wheel | Solid wood, standard glass |
Commercial | 400+ lbs | Reinforced Extruded | Precision 4-wheel | Oversized, heavy glass |
Experienced carpenters follow a simple rule of thumb. Always over-spec your component choices. If your door weighs exactly 120 pounds, do not buy a kit rated for 125 pounds. You push those components to their absolute maximum limit every single day. Instead, opt for a 200-pound rated heavy-duty track. The heavier system ensures effortless operation, extends the lifespan of the rollers, and provides peace of mind.
The structural integrity of the pocket wall requires careful planning. A standard wall gains rigidity from vertical studs spaced every 16 inches. A pocket wall removes those solid studs to create a hollow cavity. You must compensate for this loss of structural rigidity.
Standard 2x4 framing works for basic residential installations. However, 2x6 framing is significantly superior. When you build a 2x6 wall, you gain a massive advantage in cavity depth. This extra depth allows you to use thicker, stiffer split studs. Stiffer studs resist bowing when people lean against the drywall.
Furthermore, a 2x6 wall provides essential space if you need electrical bypasses. Running electrical wires through a 2x4 pocket wall is extremely risky. A stray drywall screw could pierce the wire, or the sliding door could rub against a shallow electrical box. The 2x6 structure offers ample room for shallow switch boxes while keeping the door completely unobstructed.
You must think about the future use of the wall before you hang the drywall. Homeowners frequently want to install towel bars, grab bars, or heavy picture frames on the wall. Driving a screw into a standard pocket wall cavity will immediately scratch the hidden door.
To prevent this, install plywood blocking inside the framing before closing the wall. Secure 3/4-inch plywood between the external framing studs. This provides a solid, safe anchor point for future hardware installation. The homeowner can mount a heavy towel bar directly into the plywood without ever penetrating the hollow cavity behind it.
Commercial spaces must adhere to ADA compliance rules. These regulations mandate minimum clear width requirements for doorways. An ADA-compliant entrance usually necessitates a 36-inch or 42-inch slab. Additionally, the door must fully clear the opening to allow wheelchair access.
You must also account for specific pull-hardware clearances. The handle cannot sit flush inside the pocket if someone needs to grip it from a wheelchair. This means a portion of the door must remain protruding from the wall cavity when fully open. You must factor this protrusion into your clear width calculations during the framing stage.
Real-world carpentry forums are filled with horror stories about sliding doors. By leveraging the expertise of seasoned professionals, you can avoid these costly mistakes. Recognizing potential failures early in the build phase saves thousands of dollars in rework.
Using the wrong fasteners represents the most common installation failure. When contractors hang drywall over the pocket frame, they often use standard 1-5/8 inch drywall screws. These long screws push entirely through the split studs and protrude into the hollow cavity. The moment the homeowner slides the door open, the sharp screw tips gouge deep scratches across the expensive wood slab.
You must rigorously control fastener length. Only use 1-inch or 1-1/4 inch screws when working around the cavity. Always double-check screw penetration depth before hanging the actual door.
Using standard dimensional pine for split studs invites disaster. Wood inevitably warps as it dries and reacts to humidity. If a split stud bows inward, it pinches the cavity. The door will scrape loudly every time it moves. Sometimes it will jam completely.
To mitigate this risk, never use standard lumber for the split jamb. We strongly recommend using steel-reinforced split studs provided in premium kits. Alternatively, use LVL (Laminated Veneer Lumber). Engineered lumber resists warping, ensuring the cavity remains perfectly straight for decades.
Many installers focus entirely on the top track and forget the bottom guide. A sliding door requires a bottom guide to keep it centered. Without it, the door will swing like a pendulum and smash into the split studs.
Failing to leave adequate space for this bottom guide causes major operational issues. You must install the floor brackets carefully to ensure they align perfectly with the top track. If the guide is slightly off-center, the door will bind and require significant force to pull. Plumb your bottom guides exactly with a laser level.
Successfully installing a sliding system requires a strict sequence of logical decisions. You must first measure the desired finished opening and select your specific door slab. Note its exact weight and thickness. Next, purchase the appropriate weight-rated pocket door hardware that exceeds the slab's demands. Finally, frame the rough opening strictly according to that specific manufacturer's dimensions, ensuring everything is perfectly plumb and square.
Do not guess on framing dimensions before buying your components. Your immediate next step is to finalize your slab selection. Download the technical specification PDFs for your chosen kit. Verify your rough opening tolerances, account for your finished floor height, and plan for internal blocking. If you need further guidance on selecting heavy-duty components for your upcoming project, feel free to contact us for expert recommendations.
A: Yes, structurally almost any slab works. However, the top edge must be solid enough to securely hold the mounting plates. Hollow core doors require a solid top rail block. Furthermore, the hardware system you choose must be specifically rated for the door's exact weight and thickness.
A: A standard 2x4 framed wall is the absolute minimum requirement. Once finished with half-inch drywall on both sides, this yields a 4-1/2 inch to 4-3/4 inch total wall thickness. This provides just enough cavity space for standard 1-3/8 inch interior slabs to operate without rubbing.
A: Fixing this is notoriously difficult. You can try adjusting the top hanger pins to correct minor plumb alignment issues. However, if the internal wooden framing has warped, or if drywall screws have penetrated the inner cavity, simple adjustments will fail. Structural remediation, which means removing the finished drywall, is often required.


