

Views: 0 Author: Site Editor Publish Time: 2026-10-31 Origin: Site


Incorrectly sized storage solutions lead to wasted space, restricted access, and costly procurement returns. A fraction of an inch can disrupt an entire organizational system. Whether outfitting a commercial pantry, a residential kitchen, or a busy office workspace, purchasing storage requires more than simply checking the width of a bare shelf. You must account for dynamic variables like hinges, door arcs, and specific material load limits. We designed this guide to provide a precise, evidence-based measurement framework for selecting the right components, such as wire storage baskets and wire desktop organizers. By following these professional sizing principles, you will ensure seamless installation, high structural integrity, and maximum usability across all your operational spaces. Measuring raw space rarely guarantees a perfect fit; measuring functional clearances always does.
Always calculate usable space, deducting clearances for hinges, door frames, and mounting hardware.
Account for the "taper effect"—many wire storage baskets have a smaller base than top opening, impacting adjacent placement.
Vertical clearance must include a minimum 2-to-3-inch access gap above the basket rim for drop-in accessibility.
Worktop sizing relies on footprint-to-depth ratios to prevent tipping hazards under heavy loads.
Many professionals fall into a common measurement trap. They rely solely on manufacturer overall dimensions to plan their storage layouts. They forget to account for shelf lips, bracket intrusions, or track hardware required for pull-out systems. This oversight often leads to items scraping against cabinet frames. It also causes frustrating layout bottlenecks. Accurate sizing requires a holistic view of the storage environment.
You must establish strict success criteria for shelf integration. First, achieve zero overhang. A flush placement maintains aisle safety and cabinet closure. Second, guarantee unhindered door functionality. Hinge mechanics need breathing room. Third, ensure the load distribution matches the shelf's specified weight rating. Placing a massive container on a fragile shelf invites structural failure.
Worktops demand a different set of success criteria. Surface storage interacts directly with human activity. A stable footprint acts as the primary requirement. Immediate visual accessibility follows closely. You need to identify items instantly without rummaging. Finally, aim for zero interference. Storage elements should never encroach upon your primary workspace activities, keyboard placement, or writing areas.
Common Mistakes to Avoid:
Measuring from the outer edges of a cabinet rather than the inner walls.
Forgetting to subtract the width of internal shelf brackets.
Ignoring the thickness of the container's own material.
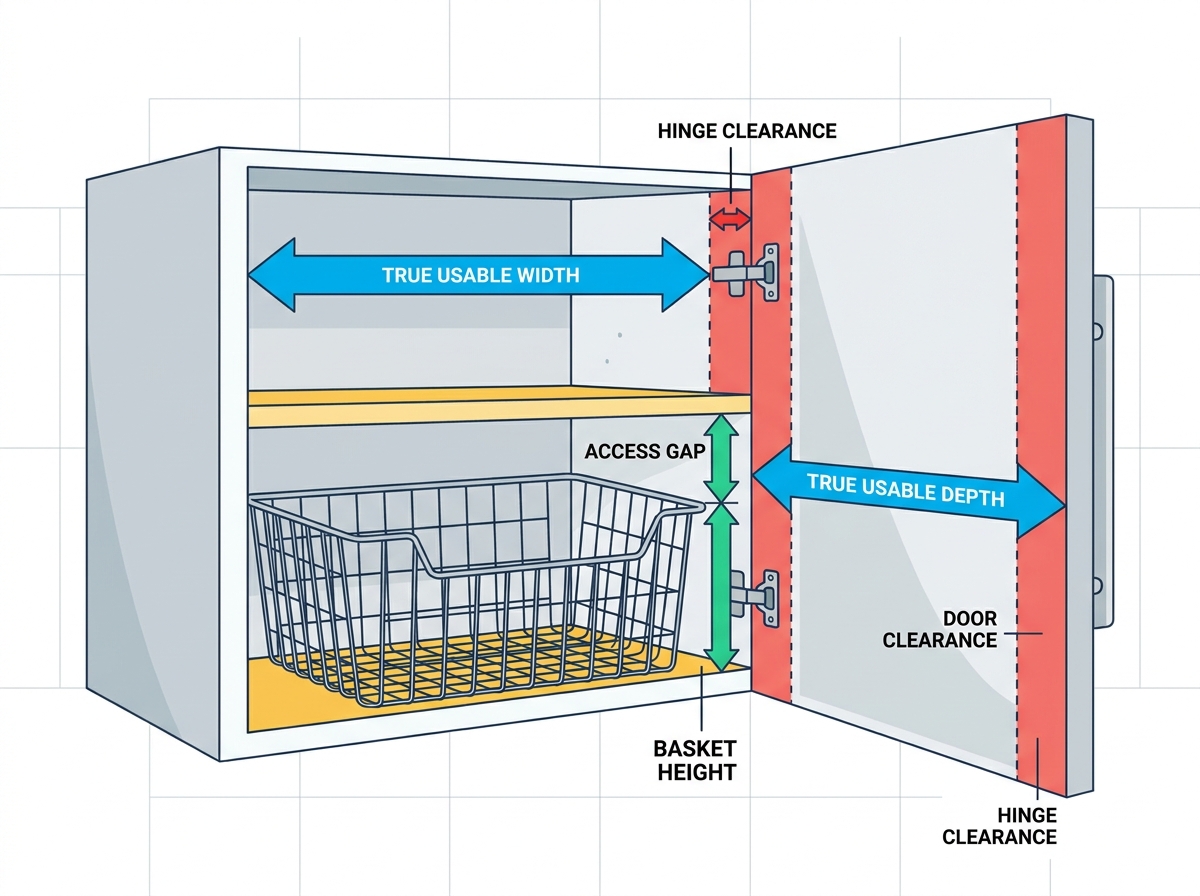
Finding the exact usable space requires careful subtraction. First, measure the absolute inside width of your cabinet or shelving unit. Do not stop there. Subtract the protrusion of cabinet hinges. Account for the inward arc of the door as it swings shut. For depth, measure from the back wall to the inside of the closed door. Subtract exactly one inch for a mandatory safety clearance. This buffer prevents aggressive door impacts and protects fragile items.
Storage bins rarely feature perfectly vertical walls. Most designs incorporate a taper effect to allow nesting during shipping. The base sits narrower than the top opening. When placing multiple units side-by-side, you must measure the top rim width. Do not just measure the base. Relying on base dimensions will cause upper rims to collide. You will quickly run out of shelf width if you ignore this geometric reality.
Height measurements often ruin otherwise perfect storage setups. Measure the total shelf-to-shelf height. Deduct your chosen container's height. You must leave at least 25% of the container’s height as open overhead space. A minimum 2-to-3-inch access gap above the rim ensures drop-in accessibility. Without this gap, you must slide the entire container out just to retrieve a single item. This drastically reduces everyday efficiency.
Static storage offers high tolerance for slight measurement errors. Pull-out hardware demands exact millimeter precision. Integrating sliding mechanisms completely changes your spatial footprint. You must add the track width, the runner clearance, and the mounting bracket depth into your total calculation. Failing to account for these tiny mechanical tolerances will jam the entire sliding system.
Clearance Deduction Chart
Obstruction Type | Recommended Deduction (Inches) | Impact on Placement |
|---|---|---|
Standard Cabinet Hinges | 0.5" to 1.0" per hinge side | Reduces total usable width. |
Door Swing Arc | 1.0" from front depth | Prevents closing interference. |
Overhead Access Gap | 2.0" to 3.0" minimum | Ensures comfortable hand clearance. |
Pull-Out Side Runners | 0.5" to 1.0" per side | Required for track hardware fitting. |
Moving from a contained cabinet to an open worktop changes your sizing strategy. Shelves define their own strict physical boundaries. Worktops offer open space, but they carry functional boundaries. You must balance storage capacity against usable surface area. The shift requires strict spatial discipline to avoid cluttering your primary work zone.
Desk surfaces require specialized sizing limits. Optimal depth limits for desks typically range between 6 and 8 inches. Anything deeper severely encroaches on keyboard, monitor, and writing spaces. Keep these organizers pushed to the rear boundary of the desk. Height considerations also matter immensely. Ensure tall organizers sit below standard monitor sightlines. Blocking your visual field creates a claustrophobic, unproductive workspace environment.
Open surface storage lacks surrounding walls to prevent tipping. You must carefully assess the base surface area. A worktop unit storing heavy items like binders or metal tools requires a broad footprint. Narrow, tall designs invite tipping hazards when top-loaded. A footprint-to-depth ratio must remain balanced. A stable center of gravity ensures safety in high-traffic commercial environments.
Desktop Placement Best Practices:
Measure the passive depth behind your monitors.
Select organizers that do not exceed this specific depth zone.
Keep high-frequency items in the lower, front-facing compartments.
Anchor taller document sorters against a back wall or partition.
Physical dimensions become irrelevant if the material bends under your intended load. You must evaluate the wire gauge alongside height and width. Lower gauge numbers indicate thicker, stronger steel. Correlate your size requirements to required wire thickness. Larger spans require thicker perimeter wires to maintain structural integrity. A wide bin holding heavy root vegetables or metal fittings will warp if the gauge is too thin.
The correct size matters little if the product rusts within a month. Match the specific material finish to your environment. Vinyl-coated and epoxy finishes resist high humidity well. Chrome-plated options suit dry, climate-controlled spaces. For harsh chemical exposure or walk-in freezers, 304 stainless steel remains the authoritative standard. Consider how thick coatings might add a fraction of an inch to the overall dimensions.
Think beyond a single room. When evaluating broader wire storage products for facility-wide rollouts, assess the manufacturer's ecosystem. Does the vendor offer modular sizing? Consistent dimensions allow for future expansion. You might need to reconfigure pantry layouts next year. Sticking to standardized sizing grids ensures your initial investments remain compatible with future purchases.
Never allow your storage components to hang over the edge of a shelf. Even a minor 10% depth overhang creates a dangerous lever-action tipping risk. When you pull items forward to reach them, the center of gravity shifts past the shelf edge. The entire unit can suddenly pivot and fall. Always match the depth precisely to the internal shelf capacity, minus the door clearance.
Integrating aftermarket sliding tracks creates hidden risks. Mixing proprietary pull-out bins with third-party slides often leads to misalignment. The mounting brackets may not match the wire spacing. Always verify hardware compatibility before purchasing. Using pre-integrated sliding systems typically yields better results and smoother operation than piecemeal retrofits.
Many people overestimate the strength of their shelving. We must make transparent assumptions about standard particle board or MDF materials. A perfectly sized metal unit, fully loaded with canned goods, can easily exceed an MDF shelf's load limit. The shelf will eventually bow in the center. Assess both the weight of the steel and the intended contents. Reinforce longer shelves if you plan to use dense, heavy storage units.
Before confirming any bulk order, perform a final verification step. This prevents expensive logistical mistakes. You must verify every dimension against your specific environmental deductions.
Sizing Verification Checklist
Measurement Category | Verification Formula | Status Check |
|---|---|---|
Internal Width | Total Inside Width - (Hinge Width x 2) | Clear |
Internal Depth | Back Wall to Door - 1.0" Buffer | Clear |
Internal Height | Total Shelf Height - 2.5" Hand Gap | Clear |
Adjacent Spacing | Total Top Rim Widths < Usable Shelf Width | Clear |
Never buy fifty units based solely on theoretical math. We highly recommend ordering a single unit or a small batch first. Use these pieces for physical verification. Place them in your cabinets. Test the door closures. Load them with actual items to test the shelf deflection. This prototyping phase saves time and prevents massive return shipping fees on bulk orders.
Once your prototype confirms the fit, review the final purchasing logistics. Check the warranty terms regarding rust or weld failures. Verify the supplier's return policies specifically for sizing mismatches. Finally, confirm lead times. Exact dimensional requirements might push you toward out-of-stock variations. Ensure the delivery schedule aligns with your project deadline.
Sizing wire storage is an exercise in managing clearances, not just recording overall dimensions. A successful installation requires you to anticipate hinges, door arcs, load limits, and hand access requirements. Theoretical space rarely matches practical usability. Applying this systematic evaluation approach guarantees that the chosen storage solutions will function safely and effectively within their intended environments.
Next Steps:
Audit your current shelving to identify exact internal dimensions and hinge protrusions.
Calculate your true usable space using the deduction formulas provided.
Order a single prototype to test physical clearances and material durability.
Finalize your vendor selection based on modular scalability and specific finish requirements.
A: Usually the widest point, which is the top rim, but always verify to account for tapering. Many manufacturers list the maximum exterior dimensions to ensure it fits through openings, meaning the internal base space will be smaller.
A: Typically 1/2 inch to 1 inch on each side depending on the specific slide hardware. Always consult the specific track manufacturer's manual, as heavy-duty slides require more lateral breathing room than standard slides.
A: Rarely without custom brackets; evaluate pre-integrated pull-out systems instead. Standard bases lack the reinforced mounting points needed to secure slide runners safely, leading to wobbling and eventual hardware failure.
A: Base depths under 8 inches and widths under 15 inches to prevent encroachment on active workspaces. They should sit neatly at the rear edge of the desk without interfering with monitor stands or keyboard layouts.


