

Views: 0 Author: Site Editor Publish Time: 2026-10-12 Origin: Site


Ordering the incorrect hardware easily causes massive project delays. It leads to expensive return shipping costs and ruins installation schedules. Unfortunately, these completely avoidable errors happen entirely too often. While the basic concept of door swing direction seems simple, conflicting definitions create major chaos. DIY forums frequently contradict strict commercial manufacturer specifications. Buyers end up guessing at checkout. Ultimately, they pay a steep price when the wrong parts arrive. We will break down exactly how to evaluate your structural setup. You will learn the universal industry standards for determining proper orientation. Furthermore, this guide provides a foolproof framework to accurately confirm handing. By following these exact steps, you can confidently finalize any purchase without fear of making costly mistakes.
Stand on the outside: Always determine handing by standing on the "secure" side (the exterior or hallway) facing the door.
Locate the hinges: If the hinges are on the right, it is a Right-Hand (RH) door; on the left, a Left-Hand (LH) door.
Account for the swing: Pushing the door away from you is a standard swing; pulling it toward you is a "Reverse" swing (RHR/LHR).
Hardware compatibility: Directional tension hardware, like adjustable spring door hinges, strictly requires accurate handing for safe functionality.
Guessing your handing requirements almost always leads to severe business headaches. Suppliers typically refuse returns on non-refundable custom orders. Consequently, ordering the wrong orientation burns your project budget immediately. Inverted hardware orders skew project timelines drastically. Installers must wait weeks for replacement parts. Furthermore, installing incorrect swing directions often triggers building code violations. Building inspectors regularly fail commercial projects over improper emergency egress swings.
Many contractors and buyers make a very common mistake. They incorrectly assume handing depends on standing inside the room. They evaluate the door from the interior perspective. This approach inevitably leads to inverted hardware orders. You must evaluate the opening from the correct vantage point. Experience shows us this single error accounts for most return requests. The room interior is never the correct starting point.
We must establish a clear baseline assumption for this guide. We exclusively use the North American hardware standard here. The North American standard focuses on the secure side perspective. Be aware of alternative international rules. European (DIN) standards apply the exact opposite logic. European standards determine handing based on pulling the door toward you. Mixing these two distinct standards guarantees a failed installation.
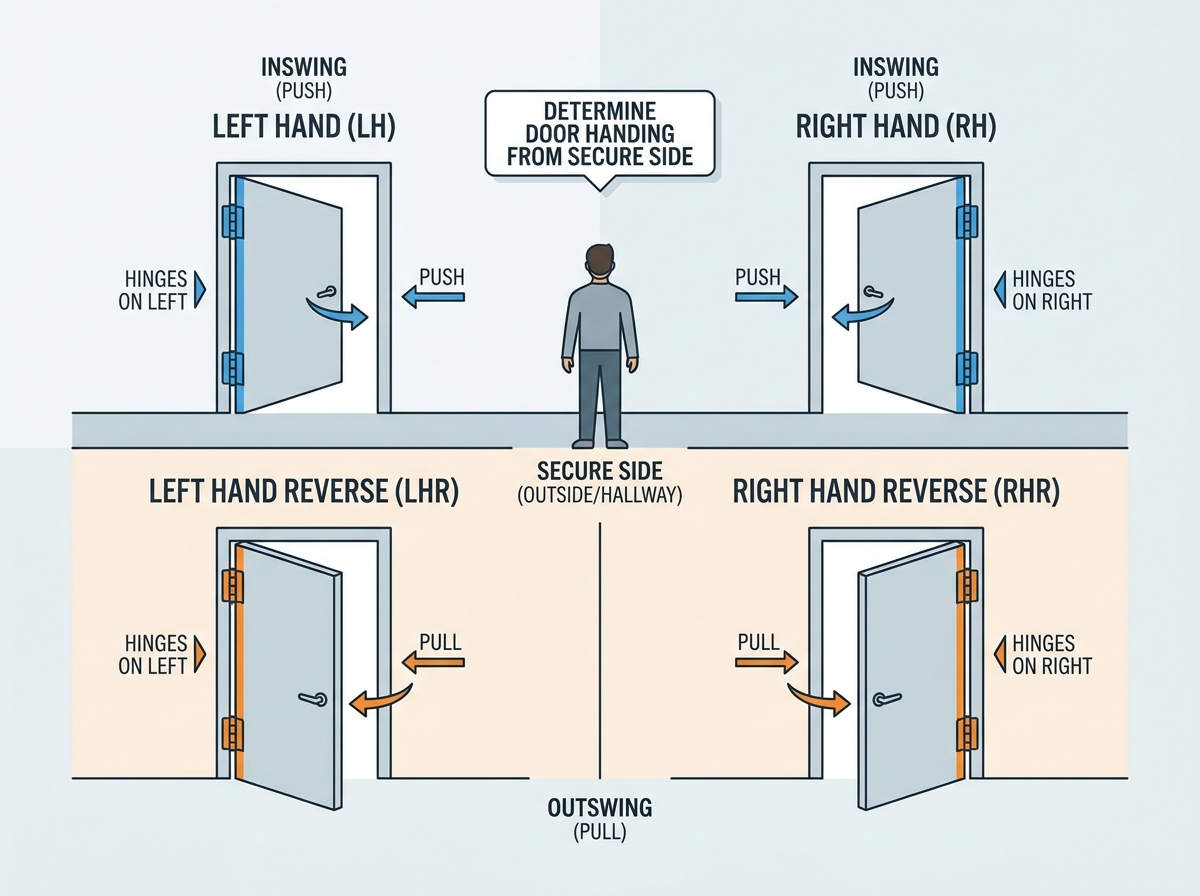
You need a reliable, repeatable method to determine handing. Relying on intuition simply does not work for complex architectural hardware. Follow this structured evaluation framework every single time. It eliminates confusion and standardizes your ordering process. The steps below guarantee accurate measurements for your new door hinges.
You must begin your evaluation from the correct physical location. Define the secure side clearly before looking at any hardware. For an exterior entrance, the secure side is always the outdoors. For an interior room, the secure side is the hallway. Do you have an adjoining bathroom? The bedroom serves as the secure side. You must stand in this exact location to begin the evaluation. Do not cross the threshold.
Close the door completely while standing on the secure side. Look directly at the physical panel in front of you. Note exactly where the structural frame mounts are located. Are the metal barrels positioned on your left or your right? This simple visual check determines the base orientation. If they sit on your right, you have a right-oriented setup. If they sit on your left, you have a left-oriented setup. Do not overcomplicate this step.
Now you must determine the physical swing direction. Reach out and open the panel. Does it push away from you into the room? This action defines a standard inswing motion. Does it pull outward toward you into the hallway? This action defines an outswing motion. Outswing motions always receive a "Reverse" designation in North American terminology.
We highly recommend learning the "Back-to-Hinge" physical test. It provides an infallible secondary verification method. Follow these exact steps to use the mental model:
Open the doorway completely.
Stand inside the frame directly against the hinge jamb.
Place your back firmly against the hardware mounts.
Point both of your arms straight out in front of you.
Swing one arm to mimic the natural closing path.
Whichever arm swings naturally dictates the final handing. If your right arm mimics the closing motion, it is a Right-Hand setup. This physical test cuts through mental confusion effortlessly.
Hardware manufacturers rely on four universal designations. You will see these acronyms on nearly every technical specification sheet. Understanding these exact definitions demonstrates professional expertise. It prevents expensive miscommunications between architects, builders, and suppliers.
Let us define the four primary categories used by North American manufacturers. Memorize these specific combinations of placement and swing direction.
Right Hand (RH): The hinges sit on the right side. The door pushes inward away from you.
Left Hand (LH): The hinges sit on the left side. The door pushes inward away from you.
Right Hand Reverse (RHR): The hinges sit on the right side. The door pulls outward toward you.
Left Hand Reverse (LHR): The hinges sit on the left side. The door pulls outward toward you.
Table 1: North American Door Handing Guide
Designation | Hinge Location (Secure Side) | Swing Direction | Common Application |
|---|---|---|---|
Right Hand (RH) | Right | Inswing (Push) | Residential Bedrooms |
Left Hand (LH) | Left | Inswing (Push) | Residential Bathrooms |
Right Hand Reverse (RHR) | Right | Outswing (Pull) | Commercial Corridors |
Left Hand Reverse (LHR) | Left | Outswing (Pull) | Emergency Exit Routes |
Commercial structures face strict building code regulations. Fire codes dictate safe emergency egress requirements. You cannot simply choose an inswing layout for a crowded room. Commercial exterior exits and high-capacity spaces heavily utilize "Reverse" handing. Outward swinging panels prevent crowd crushes during emergency evacuations. This mandatory outswing logic heavily impacts your final hardware selection. When specifying commercial hardware, you will primarily order RHR or LHR components. Standard RH and LH setups remain largely restricted to residential or private office interiors.
Basic residential hardware occasionally forgives minor orientation mistakes. Specialized architectural products offer zero room for error. You must connect the strict handing rules to specific product applications. Different solution categories require distinct technical approaches. Ignoring these variables guarantees a flawed installation.
Self-closing mechanisms require flawless orientation data. Manufacturers engineer adjustable spring door hinges to apply torque in specific directions. The internal coil winds properly only when installed correctly. Installing the wrong handing causes the spring tension to fail entirely. Sometimes, it forces the mechanism to operate in reverse. This poses a significant safety risk for heavy commercial entries. The internal spring can snap under backward torque pressure. Always verify RHR or LHR requirements before tensioning these specific mounts.
Luxury architectural projects rely heavily on specialized aesthetics. High-end custom door hardware features non-reversible decorative elements. For instance, steeple or acorn finials point specifically upward. If you order the wrong handing, flipping the unit turns the finials upside down. Furthermore, custom locksets often feature specific bevels. A beveled latch bolt must strike the plate at a precise angle. Mistakes here carry an exceptionally high financial risk. Manufacturers do not accept returns on personalized, made-to-order finials or bespoke bevels.
Some projects benefit from a simplified approach. Plain-bearing, symmetrical hardware serves as a universal alternative. These non-handed units feature a perfectly symmetrical leaf design. You can flip them upside down without impacting functionality. Standard pin removal makes them highly versatile for basic residential builds. However, we must note their strict limitations. They lack self-closing capabilities. They also cannot support complex decorative finials. Use them when functionality overrides bespoke aesthetic requirements, but do not rely on them for advanced commercial egress setups.
Never rush your final hardware order. A methodical approach prevents costly mistakes. Run through this verification checklist before you finalize your cart. Shortlist your required items and perform these next-step actions diligently.
Always compare physical frame measurements against the official plans. Cross-reference your field notes with the manufacturer's specific handing chart. Do not assume your architect documented the swing correctly. Walk the actual job site. Stand on the secure side of every rough opening. Mark the intended swing directly on the subfloor with chalk or tape. This visual verification eliminates blueprint misinterpretations entirely.
Your mounts and your locks must speak the exact same language. Verify your hinge handing matches your required lockset handing perfectly. Mortise locks feature highly specific internal geometries. A Left-Hand mortise body will not function on a Right-Hand swing. Lever handles also curve specifically for ergonomic grip. A mismatched lever points backward toward the jamb. Always double-check this critical alignment before approving the final purchase order.
Never skip the origin audit. Check exactly which standard the specific brand uses before hitting "Buy." European brands like Hoppe use the DIN standard. North American brands like Schlage use the US standard. A DIN Left equals a US Right. If you import luxury European mounts for a US build, you must translate the schedules. Contact the supplier directly if the origin remains unclear.
Multi-unit projects require strict organizational discipline. You cannot track handing for fifty rooms in your head. We strongly advise creating a standardized schedule spreadsheet. Track your specific RH, LH, RHR, and LHR designations line by line. Your spreadsheet should include these columns:
Opening Identification Number.
Secure Side Location (e.g., Corridor).
Observed Placement (Left or Right).
Swing Motion (Inswing or Outswing).
Final Code (RH, LH, RHR, LHR).
Send this completed spreadsheet directly to your commercial supplier. This bulk scaling method forces a secondary review by the hardware vendor.
Taking one minute to perform a visual check saves weeks of procurement headaches. Guessing your orientation needs leads to compromised security and blown budgets. Always establish your secure side first. Look at the barrel placement, then test the physical swing direction. Use the Back-to-Hinge mental model to double-check your initial assessment.
We encourage all buyers to apply this exact framework to their current project specifications. Walk your site, document your findings, and confidently proceed to the hardware catalog. Do not let complex locksets or tension mechanisms intimidate you. If you face highly complex commercial setups, seek technical support. Contact your hardware manufacturer's engineering team for specific guidance on intricate fire-rated assemblies.
A: Standard residential butt hinges are usually reversible. They feature symmetrical leaves and removable pins. You can simply flip them to match your setup. However, decorative finial hinges or specialized hardware are strictly handed. Finials must point upward. Always verify handing for anything beyond a basic residential pin hinge.
A: Openings that swing both inward and outward require double-acting hardware. Saloon-style or cafe setups use specific dual-action mechanisms. These specialized units do not require traditional RH or LH designations. They operate on a central pivot tension system. You simply order them based on panel weight and thickness, not handing.
A: No, they are completely different. The US standard determines orientation by pushing the panel away from you. The European DIN standard determines orientation by pulling the panel toward you. A Left-Hand swing in the US acts as a Right-Hand swing in Europe. Always verify the manufacturer's origin before ordering.


