

Views: 0 Author: Site Editor Publish Time: 2026-10-17 Origin: Site


Have you ever opened a wardrobe to find collapsing shelves? Or perhaps noticed hangers constantly scraping the back wall? Standard closet installations often fail because builders use mismatched hardware. This oversight leads to sagging boards, crushed clothing, and damaged drywall. You need to specify the correct hardware to prevent these structural failures. This process requires a precise calculation of shelf overhang, rod distance from the wall, and load-bearing requirements. We created this guide to help you design better storage and avoid costly rework. It breaks down the spatial math and structural requirements you need to know. You will learn to confidently evaluate and select hardware for custom or upgraded systems. Whether you build residential wardrobes or commercial storage spaces, mastering these specifications ensures long-lasting results.
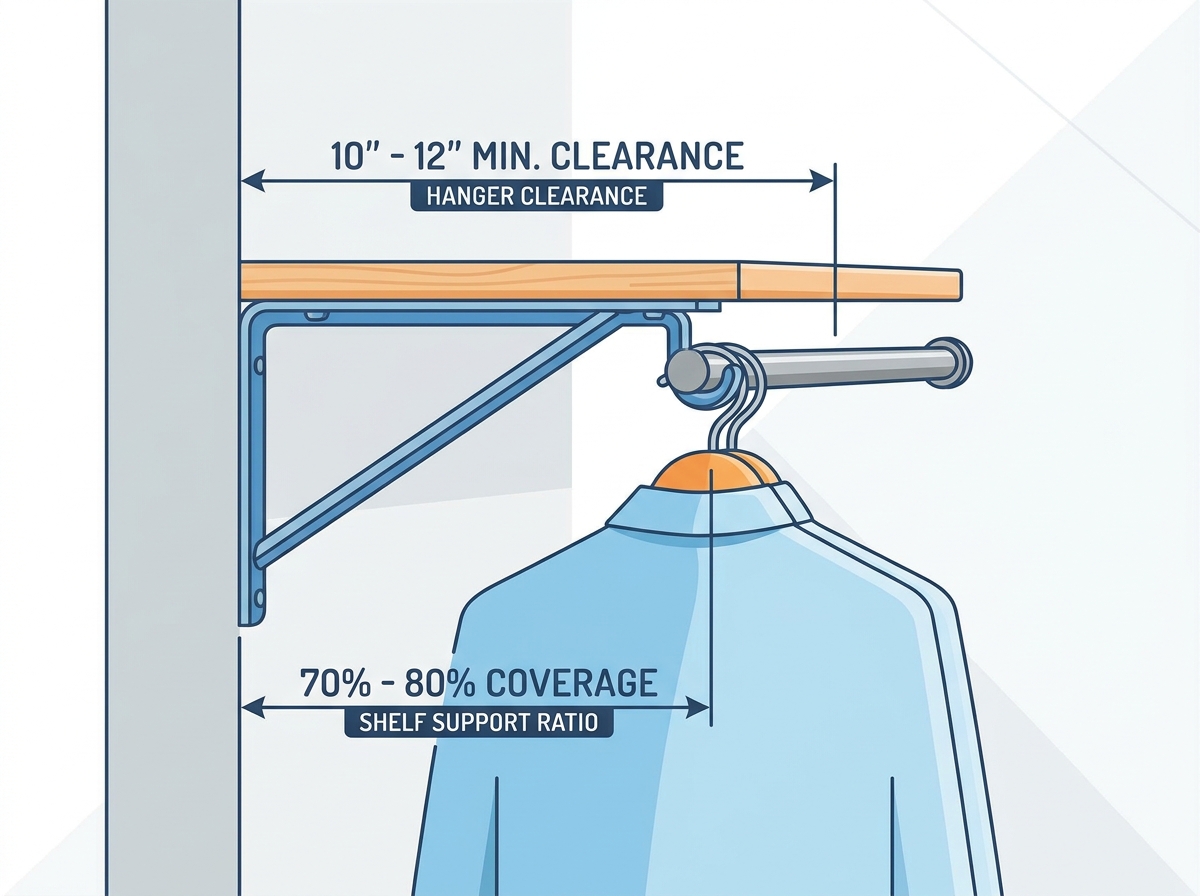
Hanger clearance requires the center of the closet rod to be a minimum of 10 to 12 inches from the back wall to prevent clothing from dragging.
Bracket depth should support at least 70% to 80% of the total shelf depth to prevent leveraging and tip-over under heavy loads.
Structural integrity relies on spacing brackets no more than 32 to 36 inches apart, mounted directly into wall studs, regardless of bracket weight ratings.
The choice between fixed architectural hardware and adjustable track systems dictates your long-term wardrobe flexibility and initial installation complexity.
The primary goal of any closet hardware system is to maximize vertical storage. You must achieve this while maintaining unobstructed access to hanging garments. Poorly specified brackets force terrible compromises between shelf capacity and hanger mobility. If you install hardware incorrectly, users struggle to retrieve items. They might even break the storage system through everyday use.
Most residential and commercial wardrobes utilize standard 12-inch, 14-inch, or 16-inch shelf depths. You choose the depth based on what you plan to store. A 12-inch shelf handles shoes and folded t-shirts perfectly. A 14-inch shelf offers a great middle ground for denim and lightweight sweaters. Meanwhile, a 16-inch depth easily holds bulky winter linens and large storage bins.
However, hanger clearance dictates the true functionality of these depths. Professionals rely on the "12-Inch Rule" for hanging garments. Standard adult hangers measure 17 to 18 inches across. The wardrobe rod must sit far enough forward to accommodate half the hanger width. You also need extra room for clothing bulk, such as thick winter coats or heavy suits. Placing the rod center roughly 10 to 12 inches from the back wall prevents garments from rubbing against the paint. It keeps clothing wrinkle-free and accessible.
Horizontal spacing only solves half the spatial puzzle. You also need to calculate the vertical drop clearance. This refers to the mandatory vertical gap between the bottom of the shelf and the top of the rod. Typically, this gap should measure 2 to 3 inches.
This vertical space allows hangers to tilt upward. Users need this room to lift hangers off the rod smoothly. If you eliminate this gap, hangers strike the shelf above. This common mistake makes retrieving clothes incredibly frustrating. It can also cause users to scratch the bottom of wooden shelves over time.
Different wardrobe loads and design aesthetics require specific bracket architectures. You cannot use a one-size-fits-all approach. Evaluate the anticipated weight and the desired long-term flexibility before selecting your hardware.
Architects often specify heavy-duty triangle brackets with rod hooks for permanent installations. These brackets provide immense structural support for rigid materials.
Use Case: They work best for heavy, static loads. Think of solid MDF, heavy plywood, or thick hardwood shelves. You choose these when you do not anticipate layout changes.
Pros: They offer exceptional diagonal shear strength. The triangular geometry distributes weight evenly against the wall. Furthermore, the built-in hook inherently dictates the exact rod drop and wall offset. This removes the guesswork from hanger clearance math.
Cons: They offer zero post-installation adjustability. You must commit to the layout permanently. They also require precise initial leveling. A millimeter of error on one bracket skews the entire shelving run.
Many modern homes utilize adjustable steel shelf brackets to achieve ultimate storage flexibility. These systems adapt as lifestyles change.
Use Case: They fit perfectly into dynamic wardrobes. They handle seasonal changeovers beautifully. They also shine in growing children's closets, where clothing sizes and storage needs evolve yearly. Installers use them in conjunction with vertical track standards.
Pros: They deliver high modularity. Users can easily snap brackets into different track slots. This allows independent adjustment of shelf heights without touching a drill or screwdriver.
Cons: You must purchase proprietary suspension tracks. Mixing and matching brands usually fails. Furthermore, the weight capacity relies entirely on the top-rail anchor strength. If the primary horizontal track fails, the entire system collapses.
When you install load-bearing closet shelf and rod brackets, you must evaluate structural standards rigorously. Hardware weight ratings provided by manufacturers are strictly tested under ideal conditions. They usually test static loads on concrete walls or perfectly exposed wood studs. Real-world specifications must account for dynamic loads and drywall limitations.
Builders often confuse static weight capacities with dynamic stress endurance. Static load refers to items resting motionlessly. A stack of folded sweaters represents a static load. Dynamic load introduces movement and sudden force.
Consider the dynamic stress of sliding heavy winter coats rapidly along a metal rod. The friction and sudden stops transfer immense kinetic energy to the hardware. A bracket rated for 100 pounds of static weight might easily warp under 60 pounds of aggressive dynamic shifting. You must over-engineer your load capacity to handle daily human interaction safely.
Rod span and material thickness dictate proper bracket spacing. Deflection occurs when a rod bows downward under heavy weight. To prevent visible bowing, you must follow strict spacing rules.
Wood, steel, and aluminum behave differently under stress. Here is a reliable rule of thumb for installations. Bracket intervals should never exceed 32 inches for standard 1-inch wooden rods. If you use heavy-duty steel tubing, you can extend intervals to 36 or 48 inches. Exceeding these spans guarantees a sagging wardrobe over time.
Rod Material and Diameter | Maximum Bracket Interval | Best Application |
|---|---|---|
Wooden Dowel (1-inch) | 32 inches | Light garments, guest rooms |
Aluminum Tubing (1-1/16 inch) | 36 inches | Standard residential use |
Heavy-Duty Steel (1-5/16 inch) | 48 inches | Winter coats, commercial storage |
You face severe risks if you rely on toggle bolts or standard drywall anchors for load-bearing supports. Drywall crumbles easily under sustained shear weight. Eventually, heavy wardrobes pull anchors straight through the gypsum board.
We emphasize mandatory 16-inch on-center stud mounting for all main structural supports. Modern home framing places wooden studs exactly 16 inches apart. You must locate these studs using a reliable finder. Drive heavy-gauge wood screws directly into the framing. This guarantees your installation will outlast the building itself.
Shortlisting the right dimensions ensures long-term safety. Choosing a bracket slightly too short creates a dangerous cantilever effect. This effect risks catastrophic failure when a user places heavy bins on the front edge of the shelf.
Professionals follow the 80% coverage rule to eliminate tipping hazards. The bracket depth should support at least 70% to 80% of the total shelf depth. This calculation prevents the board from acting like a seesaw.
Here is the standard specification formula. Suppose you design a wardrobe using a 14-inch deep shelf. You must calculate 80% of 14 inches. This equals 11.2 inches. Therefore, your 14-inch shelf requires a bracket featuring a horizontal support arm of at least 11 to 12 inches. If you use an 8-inch bracket for a 14-inch shelf, the front six inches hang entirely unsupported. A heavy box placed on that front edge will rip the back of the shelf upwards.
Hardware dimensions go beyond basic length. You must meticulously check the hook aperture and the retaining lip.
Hook Diameter Match: Verify the rod hook diameter matches your specified closet rod. Standard residential rod sizes range from 1-1/16 inches to 1-5/16 inches. If the hook is too small, the rod will not seat properly. If it is too large, the rod rattles noisily every time you move a hanger.
Retaining Lips: Many brackets feature a front upward lip to keep shelves from sliding forward. Ensure the bracket's front lip matches the exact thickness of your shelving material. Standard melamine and wood shelves typically measure 5/8 inch or 3/4 inch thick. A mismatched lip looks unprofessional and fails to secure the board tightly.
Common errors made during the procurement and installation phases easily compromise the final build. Even perfect math fails if you ignore the environmental realities of your workspace.
Before you purchase hardware or drill holes, you must map the wall for hidden obstructions. Installers routinely drive long screws into hazardous areas.
Check the blueprints or inspect the wall carefully. Look for pocket doors hiding directly behind the drywall. A three-inch screw will permanently lock a pocket door in place. You must also map out HVAC returns, plumbing pipes, and electrical panels. Specifying shorter screws and using heavy-duty toggle bolts becomes necessary only when avoiding these specific, mapped hazards.
Designing for accessibility requires a completely different approach. The Americans with Disabilities Act (ADA) provides an excellent compliance lens for inclusive design.
If you design for wheelchair accessibility, specify bracket heights strategically. Place the closet rod between 38 and 48 inches from the floor. This height range allows comfortable forward and side reaches. Furthermore, this requires hardware accommodating shallower shelves. A massive 16-inch shelf mounted too low blocks a seated user from reaching the rod beneath it. Use 12-inch shelves to improve line-of-sight and physical access.
Creating an accurate hardware purchasing list prevents project delays. Use this straightforward framework to finalize your order.
Map Wall Studs: Mark every stud in the wardrobe space. This dictates your absolute maximum bracket locations.
Calculate Total Linear Footage: Measure the exact length of your planned shelving runs.
Divide by Spacing Intervals: Divide the total footage by your target interval (e.g., 32 inches). Add one extra bracket for the end of the run to determine your exact bracket count.
Verify Rod Cuts: Order rods slightly shorter than the wall-to-wall width to allow room for installation maneuvering.
Specifying closet hardware fundamentally acts as an exercise in structural geometry. Success hinges on respecting the 12-inch rod-to-wall clearance rule. You must meticulously match bracket length to shelf depth using the 80% coverage standard. Furthermore, acknowledging actual weight-bearing limits and dynamic loads prevents catastrophic collapses.
Prioritize heavy-duty triangle hardware for permanent, high-weight storage projects. Reserve adjustable steel track systems for spaces requiring seasonal modularity, like children's bedrooms. Finally, always default to stud-mounted installations to guarantee maximum safety. Apply these practical guidelines to your next project, and you will build storage systems designed to last a lifetime.
A: You should space brackets every 32 to 36 inches. Align them precisely with wall studs, which typically sit 16 inches on center. This spacing ensures maximum structural integrity and prevents your wooden or metal rods from deflecting under heavy clothing loads.
A: No. A bracket protruding past the shelf creates a dangerous safety hazard and a glaring aesthetic flaw. Users can easily scrape their hands on exposed metal. The horizontal arm of the bracket should always measure 1 to 2 inches shorter than your total shelf depth.
A: Most standard residential bracket hooks accept round rods between 1-1/4 inches and 1-5/16 inches in diameter. You must always cross-reference the manufacturer's hook aperture specifications with your rod's outer diameter to ensure a snug, rattle-free fit.


