

Views: 0 Author: Site Editor Publish Time: 2026-10-08 Origin: Site


Ordering the wrong hardware causes immediate project delays. It compromises door integrity and triggers frustrating return-shipping costs. You need precise hardware to keep doors swinging smoothly over thousands of cycles. Hardware compatibility relies on three non-negotiable metrics. You must evaluate leaf dimensions, corner geometry, and fastener alignment carefully. Failing to match these exact specifications leads to structural failures. This guide offers a definitive framework for verifying hardware specs before procurement. We will cover everything from measuring basic dimensions to identifying screw patterns correctly. Whether you are executing a single residential repair or a bulk commercial facility upgrade, you will learn exactly what to look for. You will gain actionable insights to ensure proper fitment every time.
Hinge size is always determined by measuring the height first, followed by the width when fully opened.
Corner radius can be quickly verified using common coins (a dime for a 1/4-inch radius; a quarter for a 5/8-inch radius).
Screw hole patterns must match exactly to avoid redrilling, which weakens the door frame.
Application weight and traffic volume dictate whether standard hardware or heavy-duty commercial alternatives are required.
Mismatched hardware creates a compounding cascade of unnecessary business costs. Installers waste valuable labor hours modifying door mortises on site. They spend extra time patching compromised wooden frames. Facility managers must also process frustrating RMAs (Return Merchandise Authorizations) for incorrect parts. These administrative and logistical delays quickly derail project timelines. Getting the measurements right initially eliminates these costly bottlenecks. Precise measurement ensures your installation teams operate at maximum efficiency.
Forcing an improperly sized hinge onto a door compromises essential structural integrity. Doors rely on precise hardware alignment to distribute load evenly. Mismatched components reduce the door's load-bearing capacity significantly. This error leads to rapid door sagging over time. Misaligned hinges also cause latching failures. If a door fails to latch securely, it introduces severe security vulnerabilities. Proper alignment prevents lateral strain on the frame and keeps the entryway secure.
You must establish exact measurements as your initial evaluation baseline. Accurate data allows you to assess off-the-shelf options confidently. Sometimes, standard retail hardware cannot meet specific architectural requirements. Knowing your exact specifications helps you identify these edge cases early. This data dictates whether you transition from standard parts to exploring custom door hinge manufacturing solutions. A solid baseline eliminates guesswork and protects your hardware investment.
Common Mistakes to Avoid:
Assuming all interior doors use standard 3.5-inch hardware automatically.
Ignoring the thickness of the door leaf during the evaluation phase.
Attempting to force oversized leaves into undersized mortise cutouts.
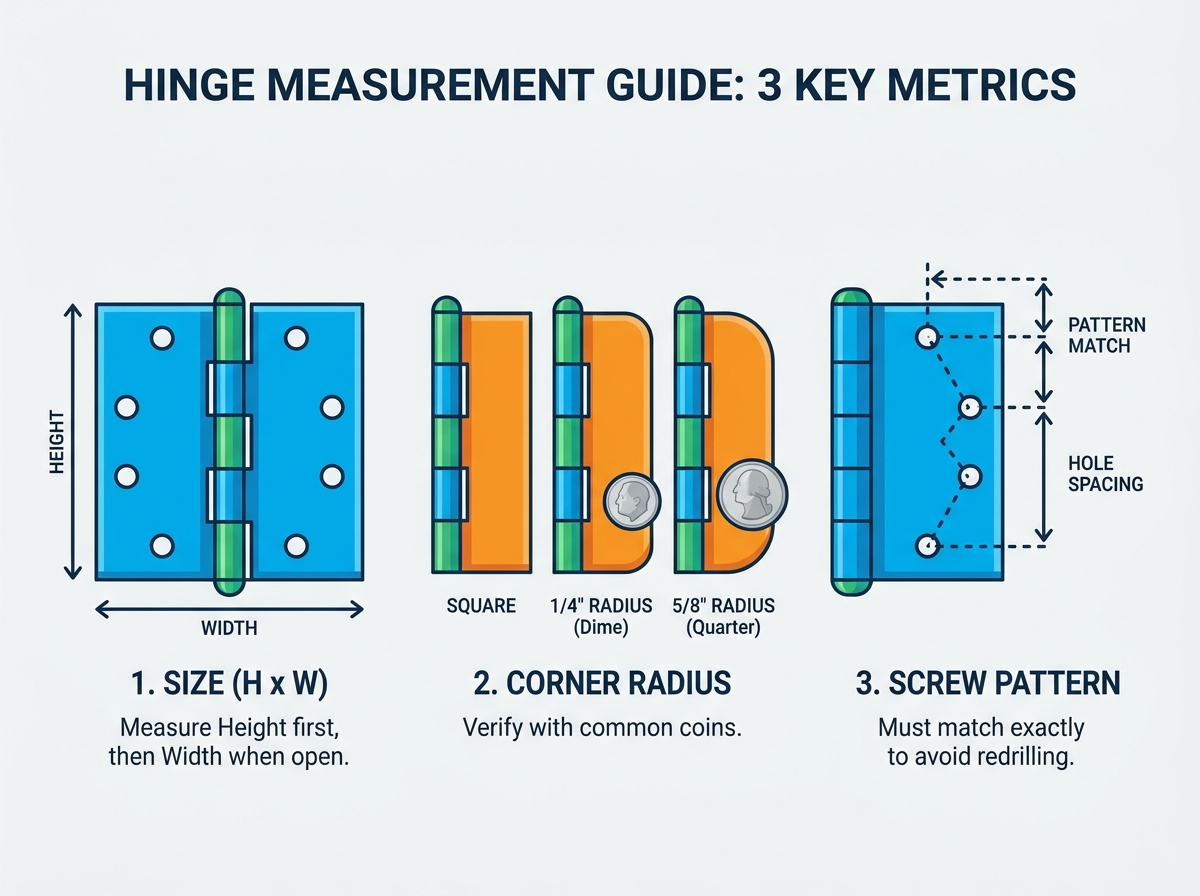
The hardware industry adheres to a strict protocol for formatting dimensions. Suppliers always list specifications as Height x Width. You must maintain this specific order when recording your requirements. Reversing these numbers causes significant confusion during the procurement process. A 4.5" x 4" unit behaves very differently than a 4" x 4.5" unit. Adhering to the height-first standard guarantees clear communication between buyers and hardware suppliers.
To measure height properly, focus on the central pin area. Industry professionals refer to this barrel section as the knuckle. Place your measuring tool parallel to the pin.
Align the zero mark of your tape measure at the very top edge.
Extend the tape down to the bottom edge of the leaf.
Record the measurement to the nearest fraction of an inch.
Most residential and commercial applications use standard height increments. You will frequently encounter 3.5-inch, 4-inch, and 4.5-inch models. Standardized sizes simplify the replacement process across different brands.
Measuring the width requires a specific physical configuration. The unit must remain fully open to ensure an accurate reading. Lay the hardware completely flat on a stable work surface. Measure from the outer edge of one leaf directly across to the opposite leaf edge. Do not include any decorative finials in this core measurement. Capturing the full open width ensures the leaves will wrap around the door jamb correctly.
Measuring closed units represents a critical implementation risk. Many DIYers measure the visible leaf while it remains attached. This method yields highly inaccurate width data. Incorrect width calculations lead directly to improper mortise fitment. The leaves may protrude past the frame or fail to clear the casing. You must always remove the hardware and open it flat before measuring width.
Hardware manufacturers produce leaf corners in three distinct standard profiles. The classic square corner features sharp 90-degree angles. Machinists typically use routers to prepare modern door frames quickly. Router bits naturally leave rounded corners inside the mortise cutout. Manufacturers created radiused hinges to fit these automated cuts perfectly. You must identify whether your door requires a square corner, a 1/4-inch radius, or a 5/8-inch radius profile.
Field verification requires minimal specialized equipment. Installers rely on a standard field trick using common pocket change. You can determine the exact radius by placing a coin inside the mortise curve.
Insert a standard dime into the corner of the cutout.
If the dime fits the curve perfectly, you have a 1/4-inch radius.
Insert a standard quarter into the corner of the cutout.
If the quarter aligns flush, you have a 5/8-inch radius.
High-volume commercial procurement demands greater precision than the coin trick offers. We highly recommend using a digital caliper or a dedicated radius gauge for bulk orders. Commercial facility upgrades require absolute zero tolerance for measurement errors. Radius gauges provide exact mathematical confirmation before you order hundreds of units. Accurate verification prevents catastrophic installation delays across large-scale projects.
Corner Radius Verification Guide
Corner Profile Type | Verification Tool | Visual Characteristic | Typical Application |
|---|---|---|---|
Square Corner | Straight Edge | Sharp 90-degree angle | Traditional wood doors, mortised by chisel |
1/4-Inch Radius | Standard Dime | Slightly rounded edge | Modern residential pre-hung interior doors |
5/8-Inch Radius | Standard Quarter | Deeply sweeping curve | Exterior fiberglass and steel residential doors |
Upgrading your hardware introduces strict replacement constraints. You cannot simply install a square unit into a radiused mortise. Replacing a rounded profile with a square one requires manual intervention. Installers must chisel out the corners of the existing mortise block by hand. This modification adds significant labor time to every single door. Matching the existing radius profile exactly is the most cost-effective strategy.
Screw hole configurations vary wildly between different hardware manufacturers. You must identify the exact standard layout to ensure a drop-in installation. Manufacturers categorize these layouts into common shapes based on hole placement. The crescent pattern features a distinct arching arrangement. The zig-zag pattern staggers holes to prevent wood splitting. The straight-line pattern aligns all fasteners vertically. Identifying the original layout style narrows down your replacement options immediately.
Template verification requires careful physical measurement of the existing leaf. Count the total number of holes on a single side first. Common configurations include three, four, or five holes per leaf. Measure the vertical distance from the top edge to the center of the first hole. Proceed to measure the distance between each subsequent hole down the leaf. You must also measure the horizontal distance from the leaf edge to each hole center. Documenting this precise template guarantees a perfect fastener alignment.
Mismatched screw patterns create a frustrating installation reality for maintenance teams. New fasteners will deflect into the old empty voids if they sit too close. This deflection strips the wood and ruins the holding power completely. Installers must execute a time-consuming remediation process when patterns fail to match. They must plug the old holes using hardwood dowels and premium wood glue. Installers then wait for the glue to cure before redrilling pilot holes. This intensive process destroys installation efficiency.
Best Practices for Fastener Alignment:
Always prioritize an exact hole-pattern match during the procurement phase.
Use a specialized self-centering drill bit if you must drill new holes.
Keep longer replacement screws handy to bite into deeper, fresh wood.
Smart buyers prioritize an exact template match above aesthetic preferences. You should use your documented hole pattern to filter supplier catalogs aggressively. Finding a verified match when shortlisting replacement door hinges minimizes installation friction significantly. An exact match allows technicians to reuse the existing pilot holes safely. This simple alignment check turns a complex carpentry job into a fast hardware swap.
Standard residential hardware cannot withstand the extreme forces of commercial environments. Traffic and load considerations dictate the necessity of heavy-duty upgrades. You must evaluate the raw weight of the door leaf carefully. Solid core wood and hollow metal doors exert massive downward shear forces. You also need to assess the application frequency. High-traffic entryways enduring hundreds of cycles daily require robust engineering. The presence of hydraulic door closers also amplifies the stress placed on mounting hardware.
Commercial facilities demand specialized mechanics to maintain long-term reliability. We strongly position commercial ball bearing door hinges as the necessary upgrade for demanding environments. Standard friction joints grind against themselves under heavy loads. Ball bearing models utilize permanently lubricated steel spheres between the knuckles. This design eliminates metal-on-metal friction entirely. Upgrading to ball bearing mechanics prevents premature wear and stops heavy doors from sagging over time.
Standard catalogs occasionally fail to cover complex architectural challenges. Your project might involve highly specific specialty requirements. Heritage restoration projects often feature unusual legacy mortise dimensions. Certain medical or governmental facilities mandate rigid, non-standard security compliances. You might also encounter custom door thicknesses requiring extended leaf widths to clear thick trim. Standard retail options provide no value in these strict scenarios.
Engaging a specialized manufacturing partner becomes essential for complex edge cases. Custom fabrication allows you to specify exact metal gauges and unique pin mechanics. A manufacturer can match obscure legacy hole templates flawlessly. This approach eliminates the need to alter historic or fire-rated frames on site. Designing custom hardware represents the most cost-effective long-term solution for specialized environments. It protects the integrity of your specialized doors while ensuring total compliance.
Verifying hardware specifications eliminates installation headaches and protects your budget. Always execute a final pre-purchase checklist before finalizing any hardware order. Confirm the precise Height × Width dimensions while the leaf lies open. Verify the specific corner radius using a coin or precise gauge. Ensure the new hole pattern matches your existing door template exactly. Crossing these three items off your list guarantees success.
Committing to this framework ensures a seamless, drop-in replacement process. You eliminate the need for messy chiseling or tedious dowel repairs. Accurate procurement protects the structural integrity of your existing door and frame. You prevent long-term sagging and maintain optimal security for your entryway.
Take action today by measuring your existing hardware using this exact methodology. Direct your purchasing team to filter supplier catalogs using your confirmed dimensions. If your project involves heavy traffic or unique architectural constraints, seek expert guidance. Contact a technical sales representative immediately to scope out custom manufacturing options for your facility.
A: You can measure the height vertically while it remains on the door. Estimating the width requires measuring from the center of the hinge pin to the outer edge of the leaf. Multiply this number by two to find the approximate total width. Note that this method is less precise than measuring it fully open.
A: You cannot do this without modification. Upgrading requires enlarging the mortise cutout on both the door edge and the jamb. This modification increases labor time significantly and requires specific carpentry tools like a sharp chisel or a router.
A: Mismatched patterns create a high risk of screw holes overlapping and stripping. You must perform standard remediation to restore holding power. Drill out the old holes, insert glued hardwood dowels, let them cure, and pilot new holes for the new pattern.
A: No. Converting between millimeters and inches often creates compounding rounding errors in hardware tolerances. You must avoid these minor discrepancies. Always procure hardware using the measurement system native to the original door specifications.


